Industry Facing Materials and EOYS

End of year show Display Implementation

Going from the feedback given to previous years we realised the importance of keeping precise measurements in our display design. Knowing this, we started with planning and leaving nothing to chance. Andrew, Matthew and Kerry measured our space. Sorcha and I then divided up these measurements to determine how much space each print would get plus border space. Sorcha then took theses measurements into photoshop and further figured out how best to use the space between large and small prints.  This resulted in Photoshop documents set to 32.5 x 50 inches, 300ppi. Sorcha saved this template for each of us to add our work to. We decided to print each of our boards as one unit each (5 x boards) instead of individual prints as this was quicker to print/prepare and kept our measurements from Photoshop intact.

Seeing as our work is best displayed on screen, we each used a mac for our showreels plus an extra mac for the full film.

For preparing our space, we painted the wall, cleaned the floor and tried to make sure that our wires were taped invisibly beneath the table or under a wire mat.


C.V.

https://docs.google.com/document/d/15ytAGeDBX1tspOrjyFP36qM8RrUnaesVO32fNNw7RNw/edit?usp=sharing

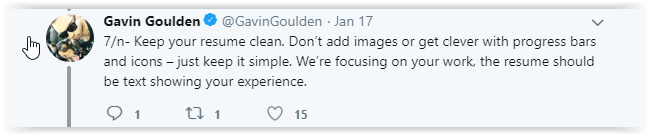
For my CV Alec suggested adding more of my artwork. My CV is currently very bland compared to others in the class. Gavin Goulden (lead character artist at Insomniac Games) suggests keeping a clean CV in his tweets on tailoring your portfolio (link). A blend between simple and showing more of my work sounds like the best to aim for.

Screen Shot 05-28-18 at 09.05 PM.PNG


Showreel

Business Cards

For my business cards, Alec has suggested to include my profile picture on one side and either my environment art or a render on the opposite side. The above black/white design is what I printed before I received the feedback. It’s quite minimal so I may redesign it with feedback to make it more memorable.

Project Poster

Using Matthew’s poses which he prepared for EOYS, I composed new scenes with our props and put together the following two posters. For the landscape poster Alec suggested removing the clutter from behind Tato, adding the strangeling in the doorway and adding a warm light to break up the blue.

For the second portrait poster below that, Sorcha did some paint-over to make it pop more. Andrew provided a Photoshop template with the correct dimensions to everyone in the class as he printed everyone’s posters.

Any other Team/Project Branding for EOYS Display

We visited FabLab (website link) to get the “Nami the Last Witch” logo cut out for above our display (about an arms length:D). Sorcha and Kerry are also getting Nami and Púca 3D printed.

Portfolio  (optional, e.g. Artstation/Sketchfab etc)

https://crowlena.wixsite.com/crowlena

https://www.artstation.com/crowlena

Environment Artist Jobs and Skills

I’m looking into the skills that I need to develop in order to apply as an environment artist. During final year I’ve worked on both 2D concepts and 3D production for environment. However, I feel like I’ve only skimmed the surface of either and have a lot of work ahead of me in order to be industry level.  I’m determined to develop my skills but still feel that I need to experiment in both 2D concept design and 3D modeling, texturing and lighting in order to determine what I route I should specialise more in.

In order to apply for a job I’m considering the specific skills that I need to showcase in my portfolio. I’ve been looking at both games and live action centered jobs as I feel like I could still branch into either. The following are just a few of the job listings/requirements that I’ve looked at to help me find more focus and see what areas I’m lacking in.

Continue reading

Barton, G. Don’t Get a Job…Make a Job

These are some of my notes from reading “Don’t Get a Job, Make a Job” by Gem Barton.

Release early and release often. Don’t just rely on a cv to tell your skills, create proof! (p.23)

Your personality is your brand. Don’t be afraid to promote yourself.

Going Mobile

Go to the clients, don’t make them come to you.

“Having a hook that is a perfect match for your business needs as well as a strong brand identity is the ideal situation to put yourself in.”

“…we learn most when we act on our ideas instead of questioning them to death.” –

the Free Architecture stall idea broke down the barrier for having a conversation with architects.

Build your ideas for the world to see so that you become a familiar name. e.g. an architecture student built his masters project inside a bus which he then drove around to present.

Specialism versus Diversity

Be t-shaped.

Tough Calls

Competitions that you entered for well know brands are a good conversation point in interviews. Think of how you are spending your time now . This might prompt a tough decision of what you need to give up in order to pursue what will realistically get you the jobs that you want.

Experience – “work for others in order to understand how the industry works from the inside, how to deal with clients and suppliers, and how to manage a studio in the best way.” (p. 78)

“…always be alert to what surrounds you, work for others before you start your own studio, and be very patient”.

“The results are stronger when you exchange ideas with people. ”

“Build best case scenarios in your imagination”. Write a few fake CVs of possible futures and print them out.

Going it alone vs teaming up

“Hard work and commitment beat almost any other trait” (p.95). Do what you love and trust your instincts – this is common advice but at the end of the day you still need to support yourself. It’s up to yourself to put your name out there.

“Getting a diversity of experience matters, particularly if you’re going solo.” (p.96)

When you’re making a name, don’t think of who you are now, but what you want to become.

Don’t become a hermit. If you’re going it alone then networking outside the studio will be even more important. “Look for arenas to continue critical dialogues to test your ideas”. (p.97)

“Even within a team you need to be individual”

“Do everything yourself at the beginning – book-keeping, meetings, clearing up, building, drawings – it is important that you have an understanding of all aspects of practice as well as the life of the things you design.” (p.105)

“When starting a collective, it is important to set out a shared goal, a mission statement or similar, summarizing who you are, who you want to be, and the ethos behind the work you hope to produce.” (p.107)

“work out who you are and then express that”

“Don’t wait for things to happen – you are the one who can create your opportunities. Draw the art you want to see, create the events you want to attend, write the books you want to read” (Mega, p.121)

“If you have to show your portfolio to someone, highlight your ideas instead of your technical abilities….Get out of your comfort zone”.

Podcasts: Finding Jobs

I Graduated…Now What? GSG Podcast Ep. 93

These guys offer some advice on getting a job after graduation with a design degree.

  • Networking is key. Start networking and visiting studios as a student.
  • Don’t be ‘the best person in the basement’.
  • Go to events and meetups. be active online in forums and slack channels.
  • Make yourself memorable as a specific skill based identity. E.g. when people think of ‘concept artist’ they should think of your name. This is your personal brand. Market and compartmentalise yourself in a crowd.
  • Ask other junior artists how they got their job.
  • Our work is all about trying to catch people’s attention. Apply this to yourself.

Becoming a Better Artist – with Emilie Stabell

  • Do projects in your own time to find what you’re talented at.
  • The first impression in your portfolio decides whether you’re skipped.
  • Why you instead of the other applicants?
  • Cater to the company or find a company that suits your style. Display the skills that they’re looking for. Make your application personal.
  • Soft skills matter a lot in this small industry. There are maybe about 40 character modellers in London VFX.
  • Going in as a concept artist is the hardest role in this industry. Mentally exhausting to come up with new ideas everyday.
  • Storytelling/concept is a muscle that you can train. Be aware of the difference between concept art and production. Get the idea across. You are an idea artist. Use kit bashing. Create a lot of quick ideas.
  • Quantity matters. You need to explore. Create 200, throw them out and create 200 more. You need to push beyond the limits. Quantity makes you go crazy and create mad decisions.
  • Low intensity over 10 years is better than high intensity for a short time. Be analytical and have a critical eye of your weaknesses. Be consistent over a long time with a focused, clear goal. Be the water in the grand canyon. The rewards on hard mode are more rewarding than easy mode. There are stupid limitations like not having undo or save. References and the challenge of not using references. By setting yourself up to fail deliberately you learn more from when you do it again e.g. draw a horse from memory and then look at reference.
  • Get a really shit idea and then critique it until it’s amazing. Don’t just through it away. Finish projects. 
  • Put up your work for critique, don’t be afraid. Fight the words with good art. You are not your work.
  • Your first job is usually your hardest.

Getting Your First Job and Internship as a 3D Artist

  • They both made industry connections through internships which got them their jobs.
  • Tailor your portfolio. Personalise your cover letter.
  • Junior positions are more plentiful than internships.

Killer Portfolio or Portfolio Killer 2018: Advice from Industry Artists

  • Prepare yourself for lots of rejection and don’t be deterred.
  • Get rid of portfolio weeds. Quality over quantity.
  • Stills might be a better format e.g. an artstation portfolio, if you don’t have animation in your reel.
  • There is an advantage in showing a specialist skill plus a complimentary secondary skill.

Portfolio: Semester 02 Major Project

The following is a summary of my contributions in semester 2:

Semester 01 work is summarized in this post: link

Following from semester 01, I textured my model of Reymond and used the sculpting tools in Maya to make facial blendshapes. Andrew then connected controllers and rigged the torso and branches. Examples of the blendshapes used in animation are at the bottom of the post (in compositing examples), animated by Andrew.

I modeled and textures the trees and bushes assets.

I made a start on the layout for scene 03 which then needed to be redone because of a render issue. I also worked on the layout and camera sequencer set-up for scenes 01 and 05. Kerry carried out most of the work for layout as seen in the final film.

I modeled and textured the broken parts of the roof in the house interior and textured the walls and cobwebs.

I animated Púca in scene 03. This is the animation I provided which Matthew might have tweaked afterwards when animating Nami.

I did the render set-up for scenes 01, 02, 04 and 07 and composited scenes 01, 02, 03, 04, 05 and 07. These are some examples of compositing with frames from Maya versus final look from Nuke. Sorcha then comped magic VFX to these in After Effects or Premiere.


Compositing Nami The Last Witch

Semester 2 Easter – Week 13 (2018/04/02 – 2018/05/14)

Technical, Artistry


Nuke organisation and workflow

The following are some ‘before/after’ examples of shots that I composited. I used a zdepth AOV to add atmospheric distance to the shots. This was mostly important as a way to make the characters stand out from the background. The zdepth with the zdefocus node was also useful as a way of softening background areas so that the focal point had the sharpest detail. I used a lot of grade nodes too to lighten, darken and change the hue/value/saturation of the characters and backgrounds. Glow nodes gave the characters softer light bounces. Alec also suggested creating a rim light using the character’s alpha channels which I’ve added to a few of the back-lit shots. Ambient occlusion passes came in the most useful for Reymond and Nami’s hands which sometimes lacked definition because of the cel shader or emissive material.

Color/mood aims:

  • Scenes 01 + 02 – warm sunset
  • Scene 03 – bright, saturated night blue and warm orange of Reymond’s light.
  • Scene 04 – Rainy, grey desaturated
  • Scene 05 – spooky desaturated to violent red
  • Scene 06 – violent red
  • Scene 07 – calmer blue


Rendering Management

Semester 2 Easter – Week 13 (2018/04/02 – 2018/05/14)

Planning

Preparing for rendering

Rendering started with scene 02. Most of the shots in the seven scenes needed to have layout and camera adjustments as animation was carried out with the backgrounds hidden. Kerry took the bulk of scenes for lighting, cel shader set-up, and layout adjustments while I focused on render-setup and compositing. I worked on moving props out of the way of the camera for scene 02 only. Sorcha worked on the camera, lighting and shading setup for scene 06.

Before rendering on zync we needed to plan out what characters would be in each shot and the length of frames. I was responsible for rendering and setup in scenes 01, 02, 04 and 07. Kerry was responsible for rendering scenes 03 and 05 and Sorcha was responsible for scene 06. There are about 106 shots in our 07 scene, not including the intro.

We encountered a lot of errors which we also had to keep track of on the spreadsheet. The animation curves would occasionally change tangents between two flat frames. Renders on zync would also jump across the screen but render okay locally.  We think that this might be due to one or all of the plugins that we have installed.

For frame management we rendered into “SCENE_0X” folders and then manually moved the frame range to “SHOT_0X” folders but in the future it would be worth trying to automate this more as there were many thousands of frames to organise.


Scene 03 Púca Animation

Semester 02 Week 06 – Easter (2018/03/05 – 2018/04/04)

After Matthew had created the stepped animation for Nami in scene 03 (Reymond’s scene) I jumped onto blocking out and splining Púca’s animation. I didn’t have a lot of animation experience at this point but tried my best to apply what I had learned from Keith Lango’s workflow (blog link).

Technical

Before Feedback:

Mike gave me some feedback on scene 03 when I was part way through blocking out Púca. It was a lot to do with cinematography which has been a recurring problem highlighted in our feedback. It would definitely be worth getting more practice and research on this subject!

  • The edit has too much seeing and then saying. We need to hear and then cut to the speaker/sound.
  • Shot 02-03 Nami should go to Púca’s ear before the cut. Make sure that the camera is sufficiently different so that the transition doesn’t flash. Cut from mid of Nami and Púca to close-up of Nami and Púca.
  • Shot 03-04 action of them looking up should cue the cut.
  • sh05 Mike suggests that we go back to Púca throwing Nami off to focus on the message that Púca is thinking “crap a tree spirit”.
  • sh06 large empty space on screen is distracting.
  • sh07 when Púca looks off screen in sh06 we are cuing a subjective camera. Púca can’t be in his own pov in sh07.
  • sh08-09 Puca should start moving to cue the cut.


After feedback:

This was as far as I got with animating Púca.

Matthew did a few edits to Púca after this when he was polishing Nami such as when Nami pulls Púca’s horns at the start. My animation on Púca still feels quite mechanical in places. I think that this is due to my eases and timing which could be less abrupt. Púca’s walk was the most difficult part to animate but Alec gave helpful advice with regards to moving forward with the hip control instead of the global transform.

Research

I mostly used the dog walk cycle in “The Animator’s Survival Kit” as a guide but with Púca’s forarms in more of a gorilla pose. Matthew also advised me to look at lions and apply how they curl in and flip up their paws to Púca’s hands as he walks.

Animbot was useful too, particularly for creating selection buttons and using the tween machine slider for holds and offsetting inbetweens of different body parts.

http://camiloalan.wixsite.com/atoolswebsite


Keith Lango: VTS42-47 Stepped to Polished Animation

Semester 2 Week 7 (2018/03/13)

Research

These are my notes from watching Keith Lango’s video series on his workflow for a shot of animation.  It’s useful to see how much of his workflow focuses on key poses, primary breakdowns and secondary breakdowns (stepped). He spends most of his efforts on these poses, making sure that the drawings of the silhouettes are simple and have appealing curves. A lot of time is spent on creating arcs in the movements. These poses are then timed out. The splining phase is relatively short as the poses, arcs, and timing are working well before this stage.

VTS42

Start with the emotion of the character. Look for the shape of the dialogue. What is the energy of the dialogue? Does it pop up and crash, rise slow and crash etc.?

Study the line of action of different poses in the body mechanics. Even when the feet are off screen you will still be able to sense the balance. Think of feet as the foundation. What direction will the feet point to convey the stance? Emotion affects the pose of the action. Act out the motions and take note of what all your poses are. Understand what your body is doing, by doing. Animation is the believable condensation of life. 

Thumbnail your motion analysis; keys and primary breakdowns. Start by thinking through the motion (planning).

Setting up keys:

Create counter rotations for curves in the spine. Start with the hips (the point of movement in the example). 

Screen Shot 03-13-18 at 10.03 AM

Pay attention to the curves in the silhouettes of the poses.

Pose reversal. Offscreen poses can still affect on screen poses.

Build asymmetry in the facial pose. Think from squash to stretch and closed to wide in the facial pose too.

VTS43 The primary breakdown

In the example, Lango is aiming for an under-arch.

Think about the timing of separate actions e.g. the head comes through the door almost at the same time as the door opening.

This will then determine the position of objects along their motion path during the inbetween.

Think of how the limbs will be offset on the inbetween. What is moving faster/leading versus dragging?

The core of the body/hips can act as the carrier of the upper body if the hips are the pivot, therefore arrive quicker.

Think of the changing angles. Rotate angles of moving parts but find a balance. You want the torso to feel alive but not be distracting. Always consider ways to improve your key poses in the context of your breakdown too.

Think of how the silhouette morphs between poses. You don’t want it watery or strobing. Keep an eye on the poses which Maya tries to fill in. Pick points in the silhouette that might stay in the same place. Think of the drawings. It’s all just shapes moving on a 2d screen.

VTS44

Build the primary breakdown in the middle and then the smaller breakdowns like eases. The primary breakdown defines the nature of the move. Draw a line between the key poses and primary breakdown.

Screen Shot 03-13-18 at 12.33 PM 001

Get feedback after the primary poses and after the secondary breakdowns both.

VTS46 Timing

Start by planning, then space the frames according to your plan. The action should hit a few frames before the sound. 

Depending on how fast and slow the movement is you will need to add more ease to make the movement visible.

VTS47 Cleanup

Start with the hips and move up the torso.

Clean up the peaks and valleys of the graph. Clean up your geometry penetrations.

Lango adds extra character to the rotations after the f-curves are polished.

Dialogue animation is emotional. Get your narrows and wides and the jaw moving and focus on emotion instead of the nitty gritty sounds.

Every shape is unique, we’re not robots.

Start with the bigger shapes e.g. the squash of the eyes and then work smaller. Make sure that the shapes work in an emotional way.


Reymond Blend Shapes

Semester 02 Week 03 (2018/02/12)

Technical, Research and Artistry

I sculpted the blendshapes for our character Reymond. I hadn’t created blendshapes before but Andrew had some great research at hand to help me out. He kindly shared a tutorial with me that contained a detailed workflow of all the different sections of the face that would need to be sculpted. This was very helpful as I had thought to approach this by copying the faces in the animatic which would have been slower to plan out.

This tool, abSymMesh, was recommened in the tutorial as a way of checking if the mesh is symmetrical, which it wasn’t! Making Reymond’s face symmetrical was more time consuming than predicted as mirroring one side of his face over was tricky to reconnect.

Along with the list of shapes in Andrew’s tutorial, I mostly followed along with this tutorial also using the shape editor in Maya 2017.

Maya 2017 Shape Editor

These are the resulting shapes after sculpting and duplicating/mirroring to the right.

Andrew is going to complete Reymond by attaching the controls to the blendshapes and adding more body controls. The mouth will be driven by joints more than by my blendshapes.